Processes
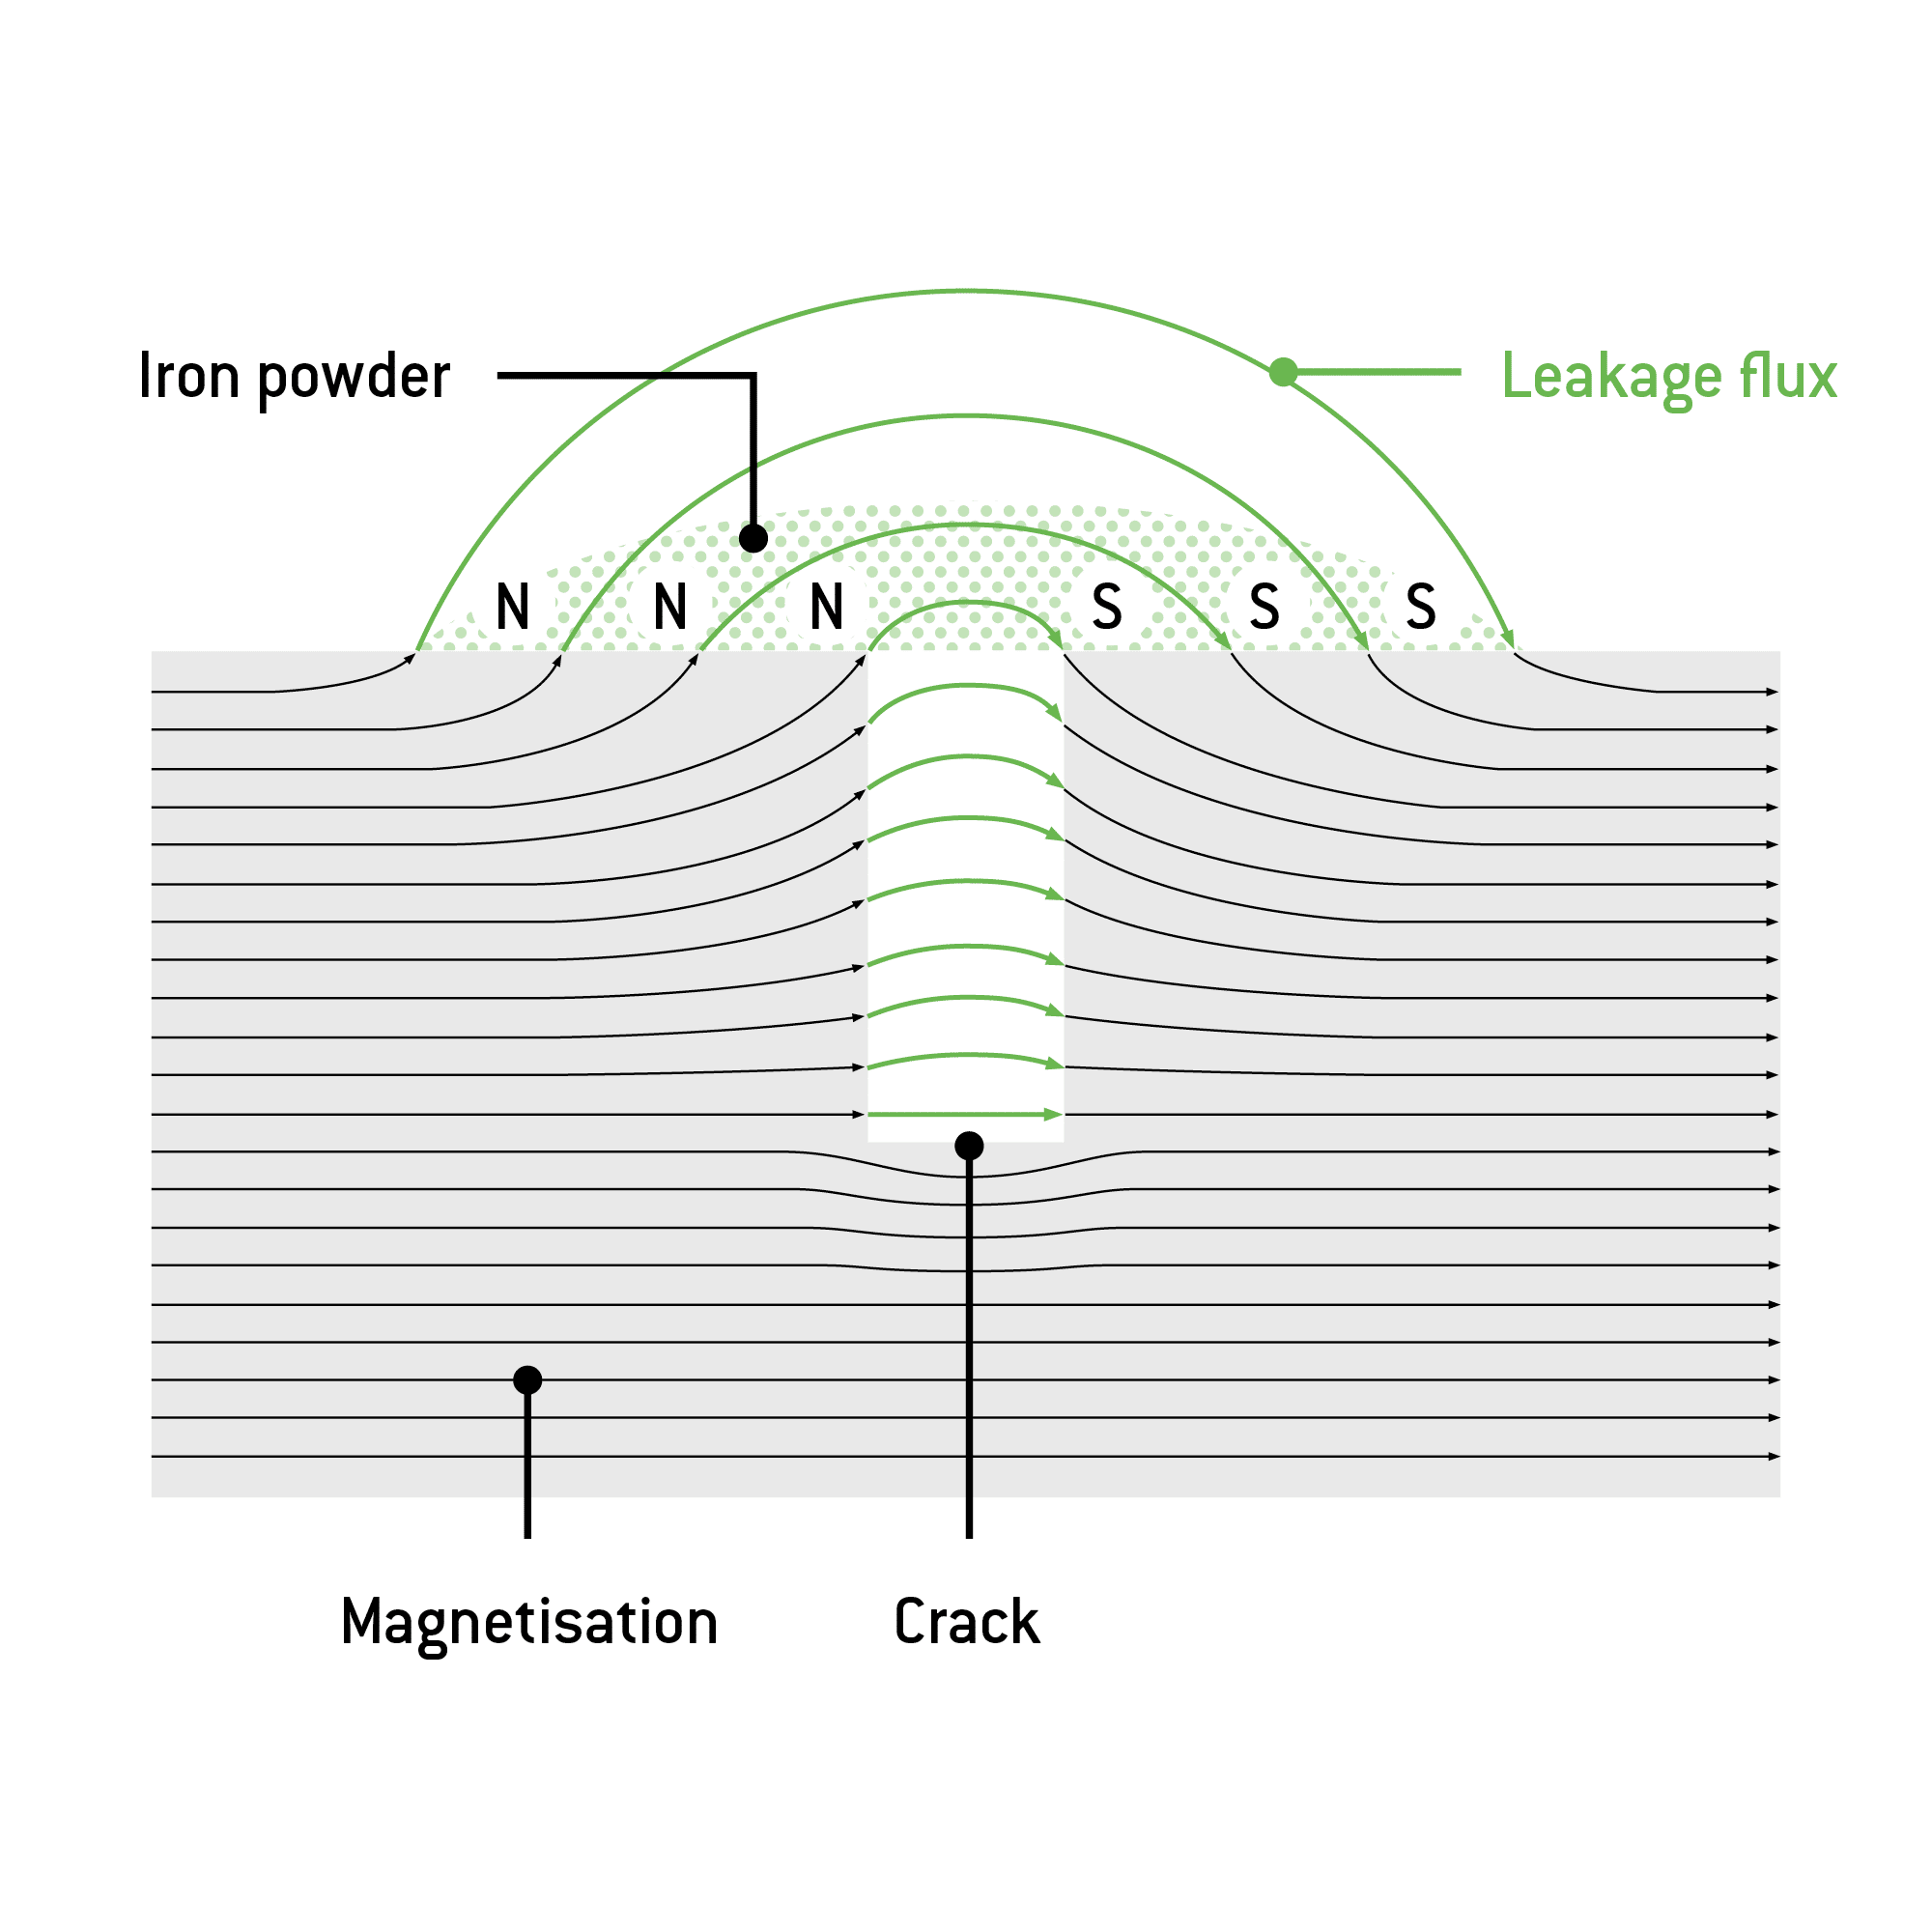
The magnetic powder crack test begins with the magnetisation of the workpiece. This creates field lines that run parallel to the workpiece surface. Cracks on the surface cause the field lines to escape, and then to re-enter after the defect location. As a result, magnetic poles form at the crack, and these create a stray magnetic field.

During the magnetisation, a powder composed of iron oxide mixed with fluorescent dye particles is scattered across the component, or washed over it in the form of an aqueous suspension. The iron powder now collects at the magnetic poles of the defective areas. In a dark room, even the finest cracks will become easily visible under UV light.
The procedure is suitable for irregularities on or close to the surface – hidden cracks with a depth of up to approx. 1 mm can be detected. This testing method can detect only cracks that run transversely to the field lines. Defects that run parallel to the field lines do not interfere with the field lines, and do not produce a stray magnetic field.
Different magnetisation methods allow the generation of field lines longitudinal and transverse to the field lines of the component surface, allowing testing for longitudinal and transverse cracks. These methods are field and current flow magnetisation, as well as combined magnetisation. Very large components can be magnetised in sections. The systems used for magnetisation must not be operated by people wearing a cardiac pacemaker.
Current flow

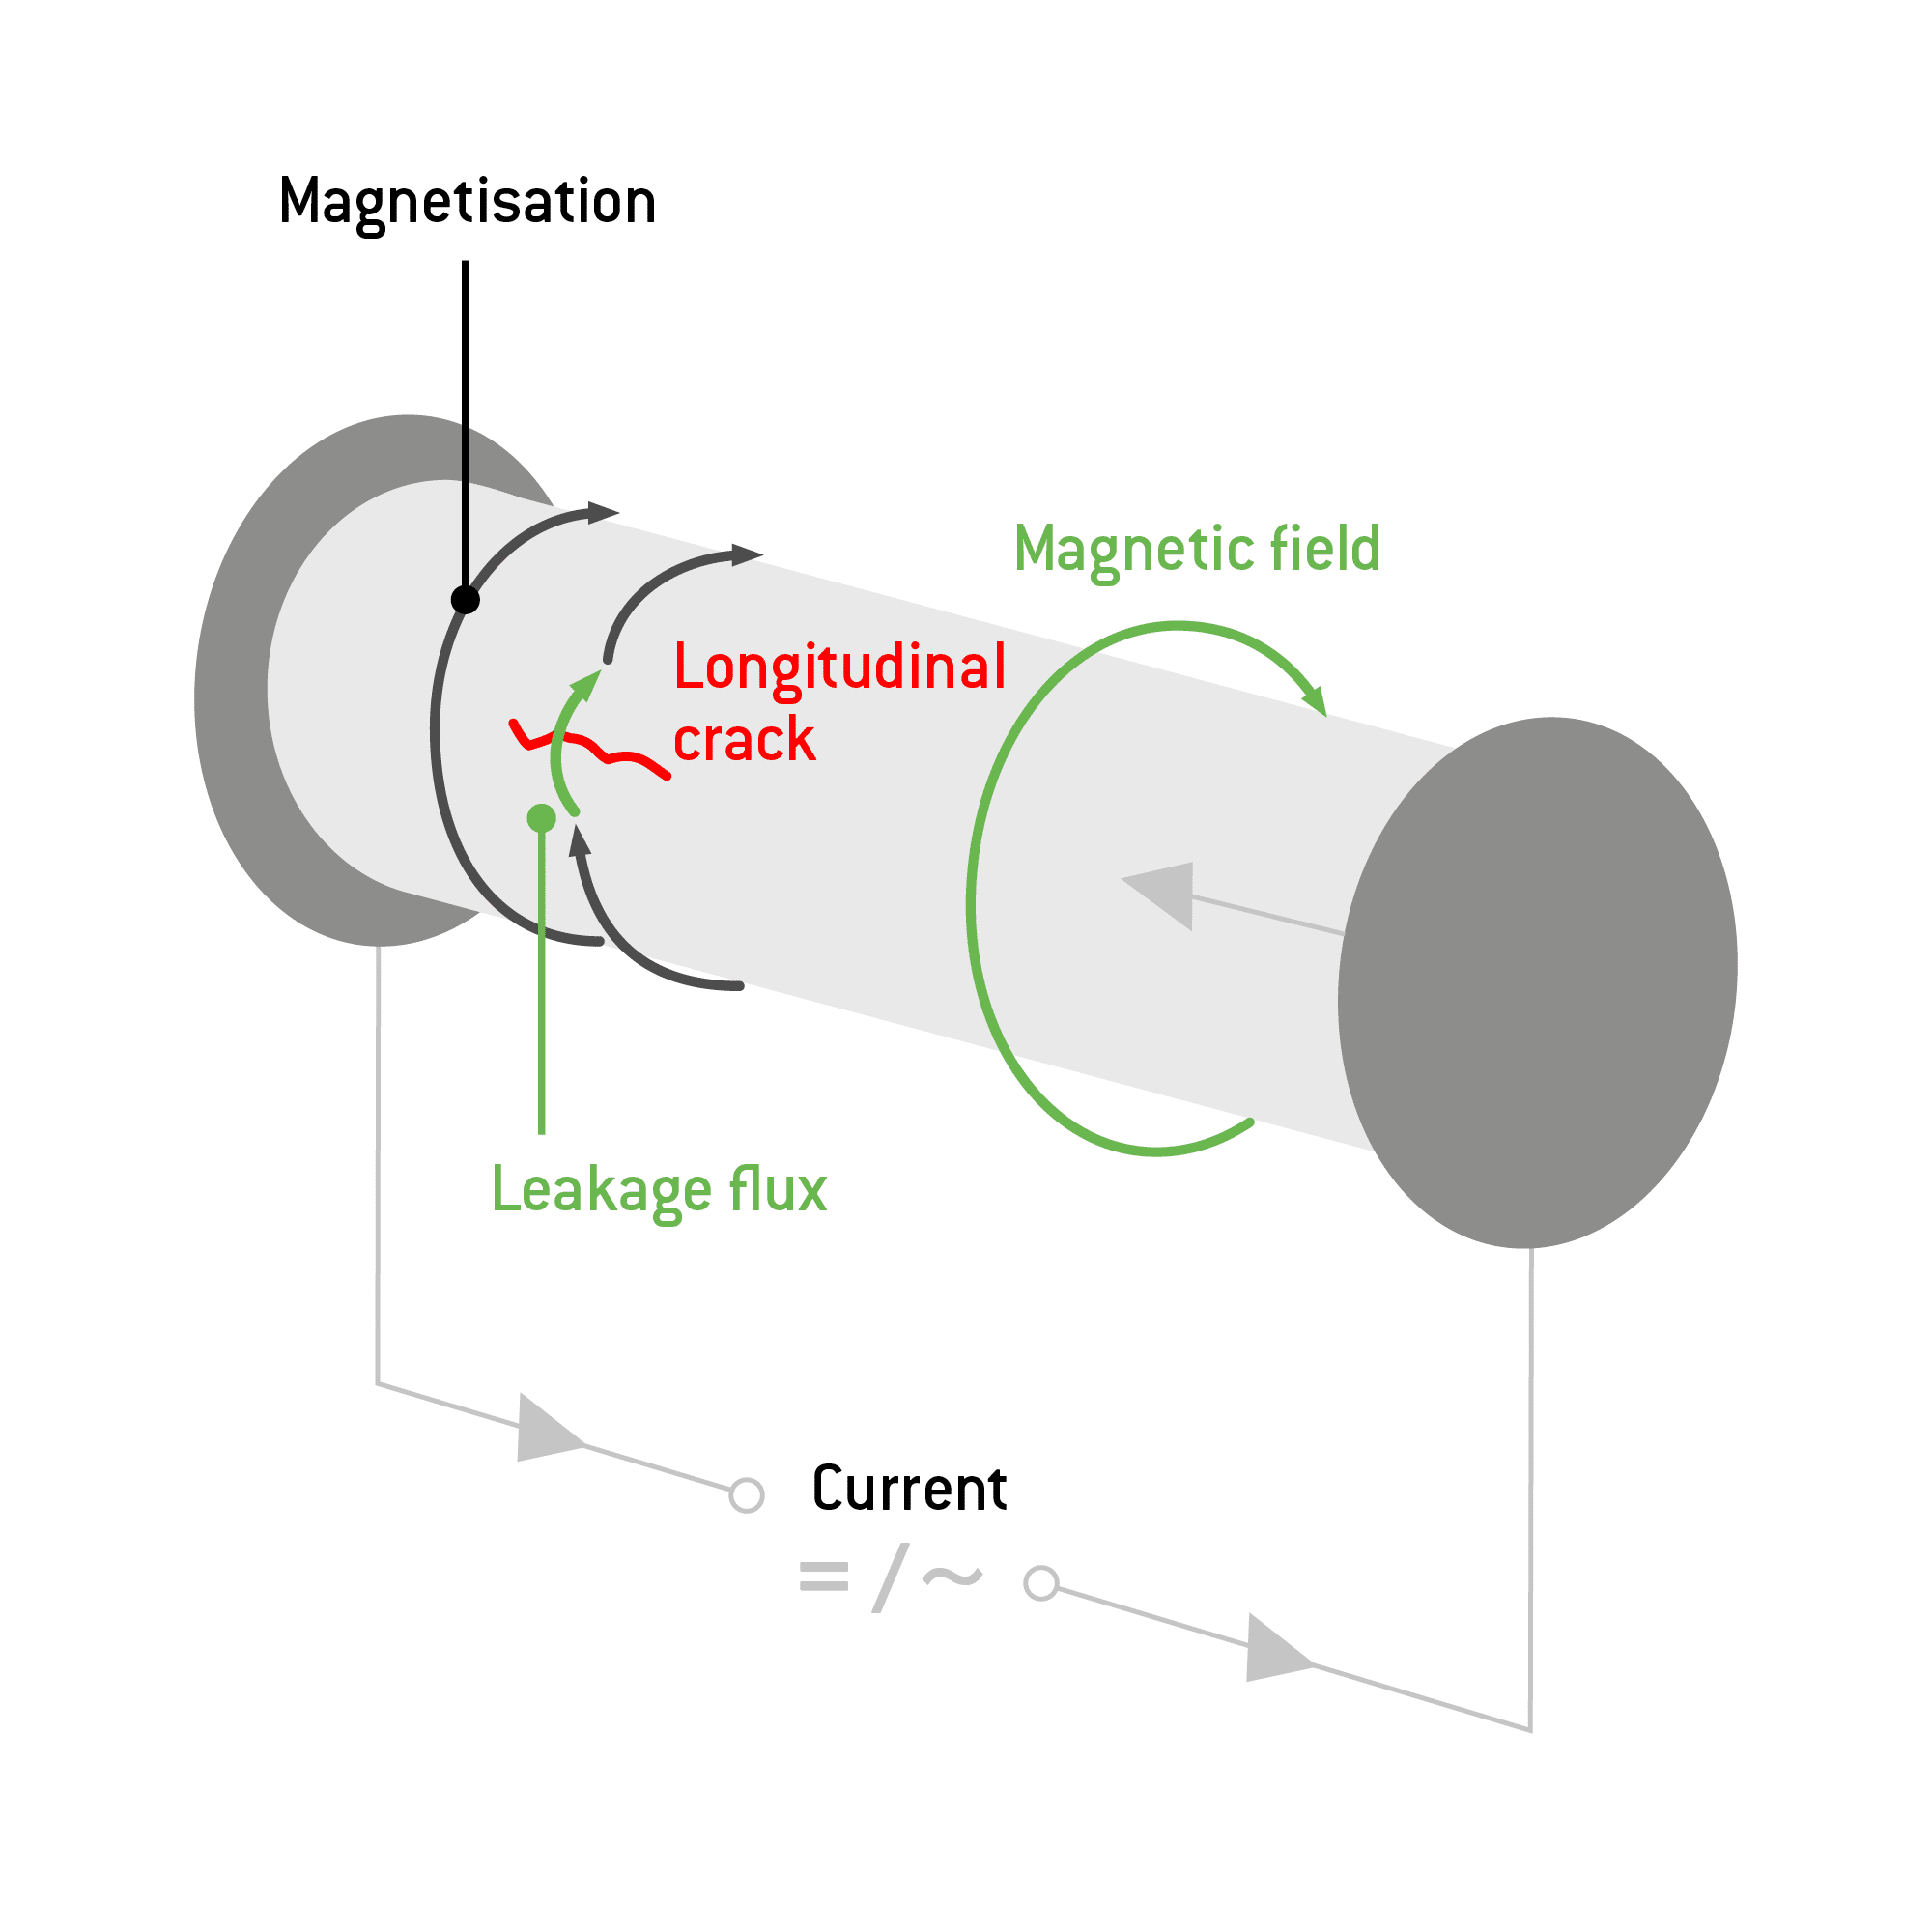
During current flow magnetisation, a current is transmitted through the component, generating a ring-shaped magnetic field around the component surface. The field lines travel transverse to the component surface. This allows the detection of cracks in the longitudinal direction by means of iron powder.
Field flow

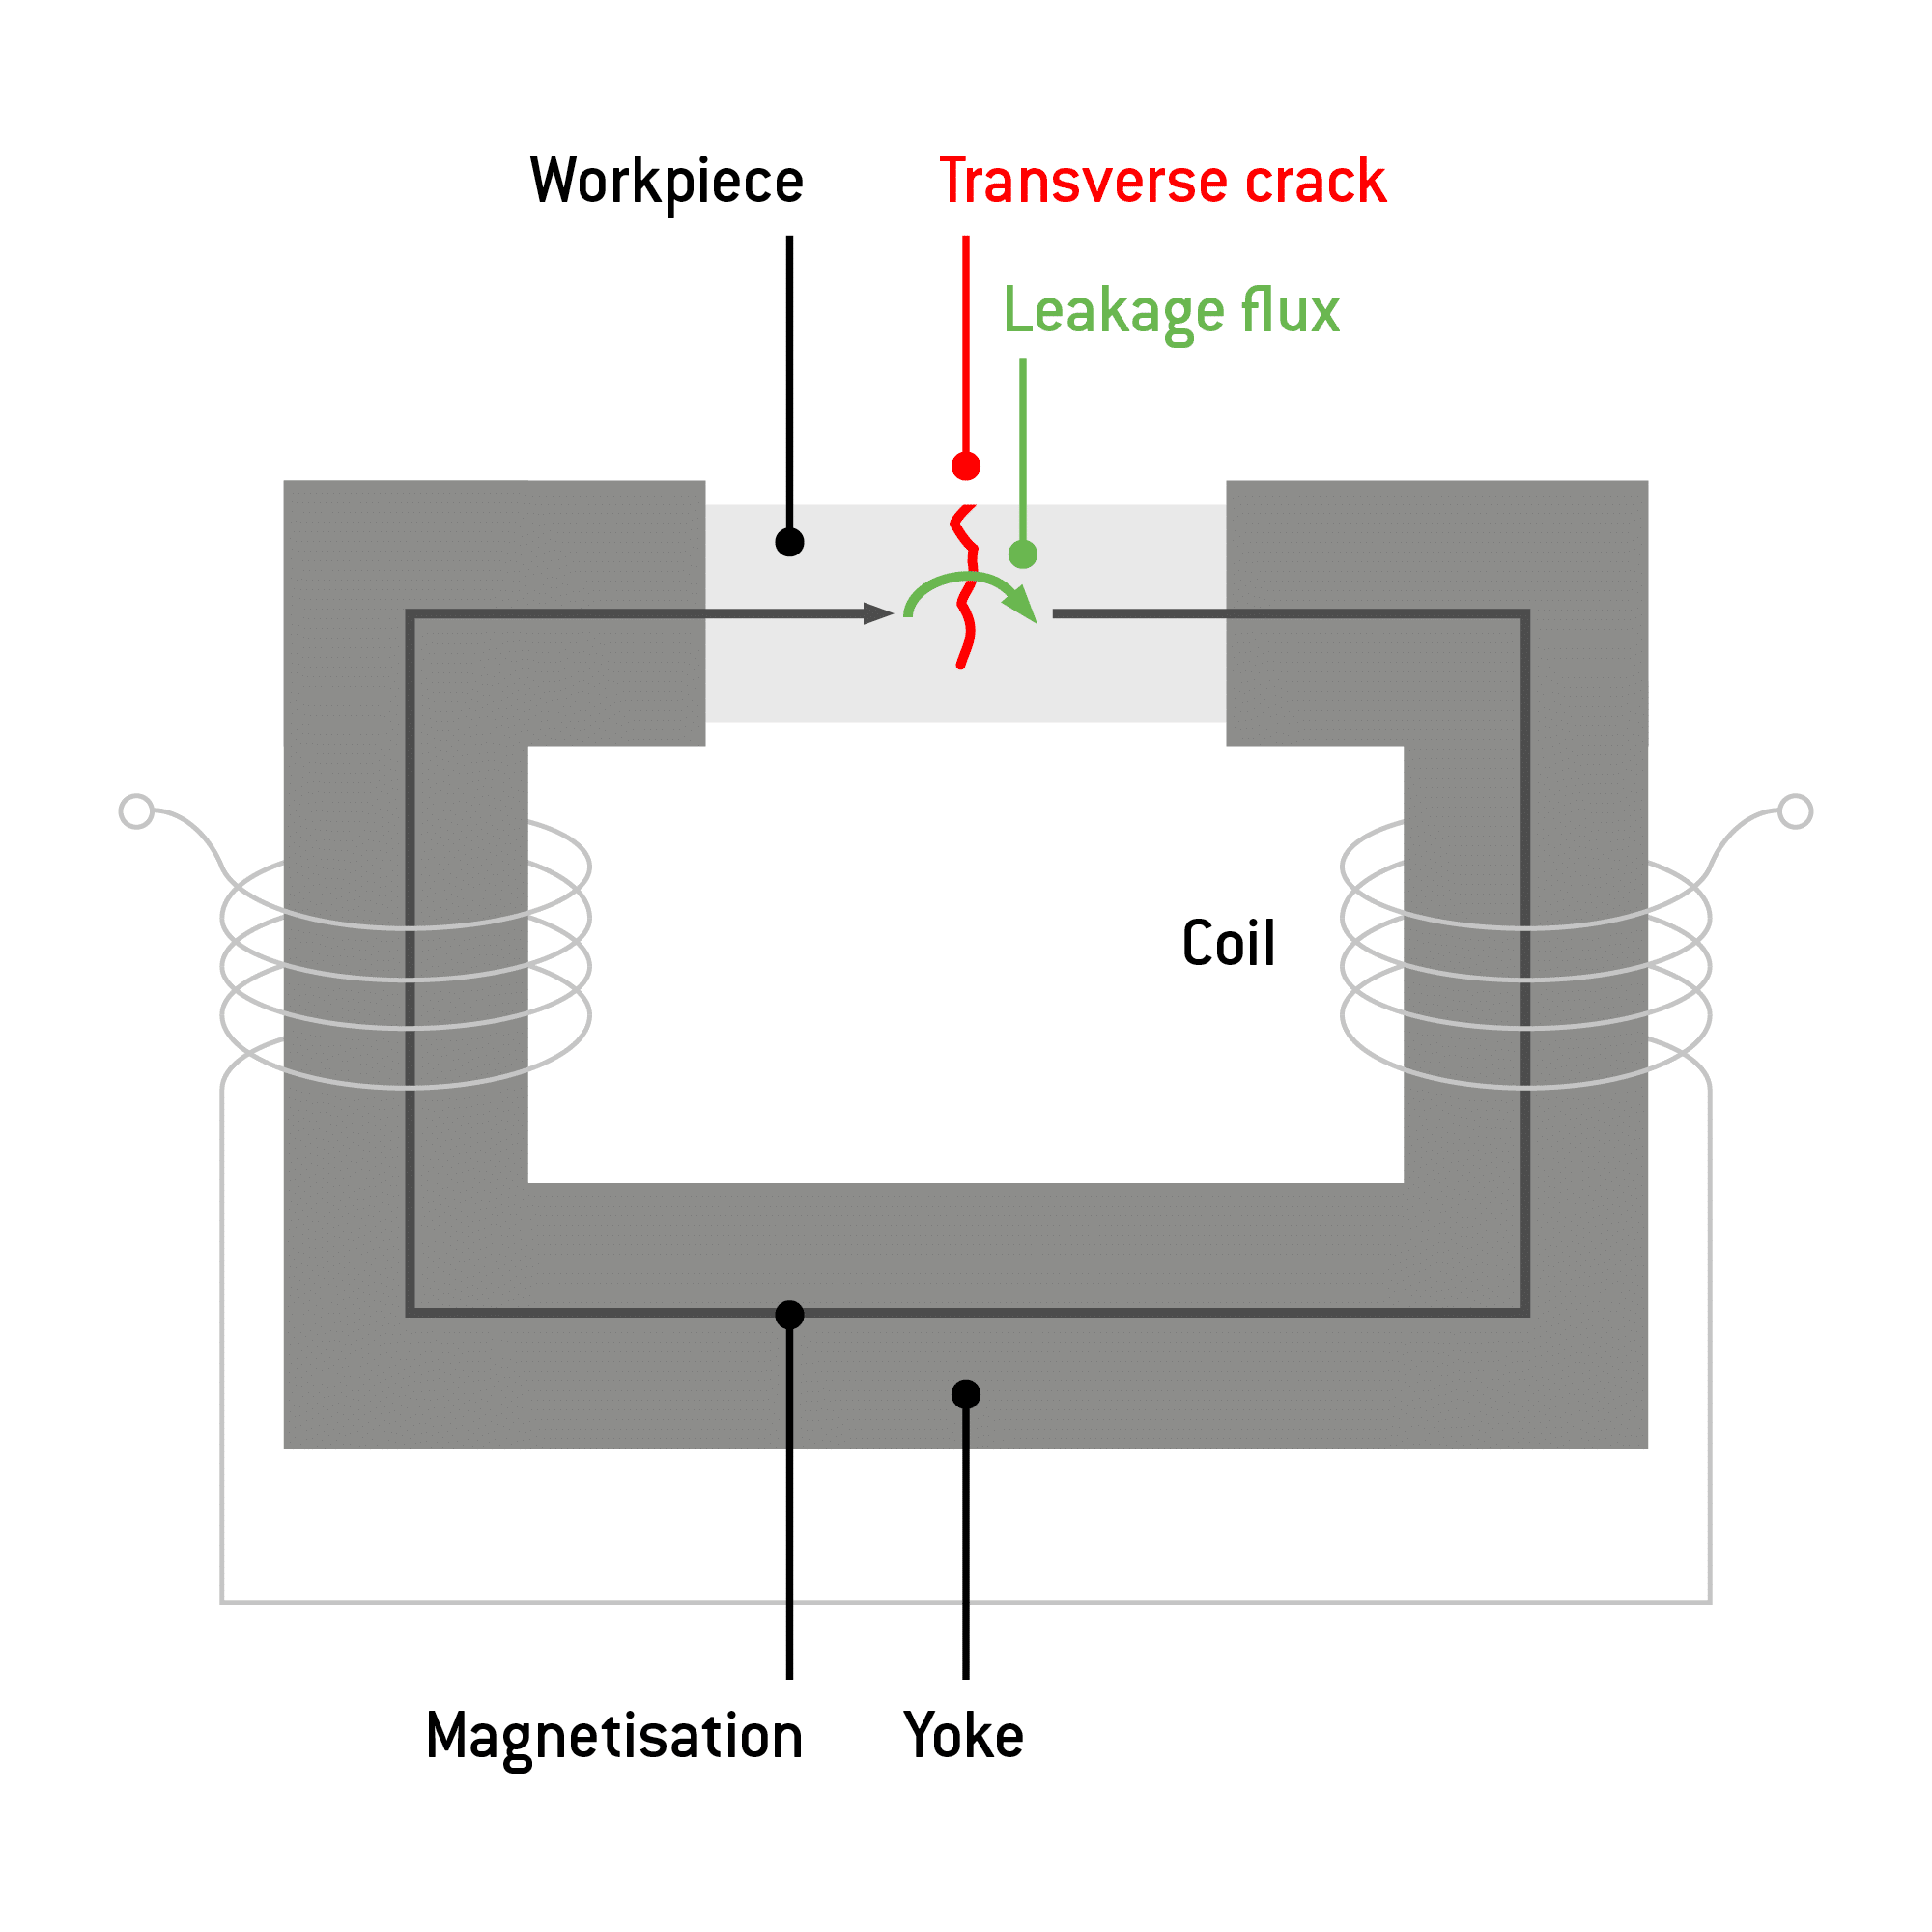
During field flow magnetisation, the current does not pass through the component itself. Instead, the component is clamped into a U-shaped iron yoke . There are electric coils on both legs of the yoke. This creates a magnetic field longitudinal to the component surface and reveals transverse cracks with the help of iron powder.
Combined magnetisation

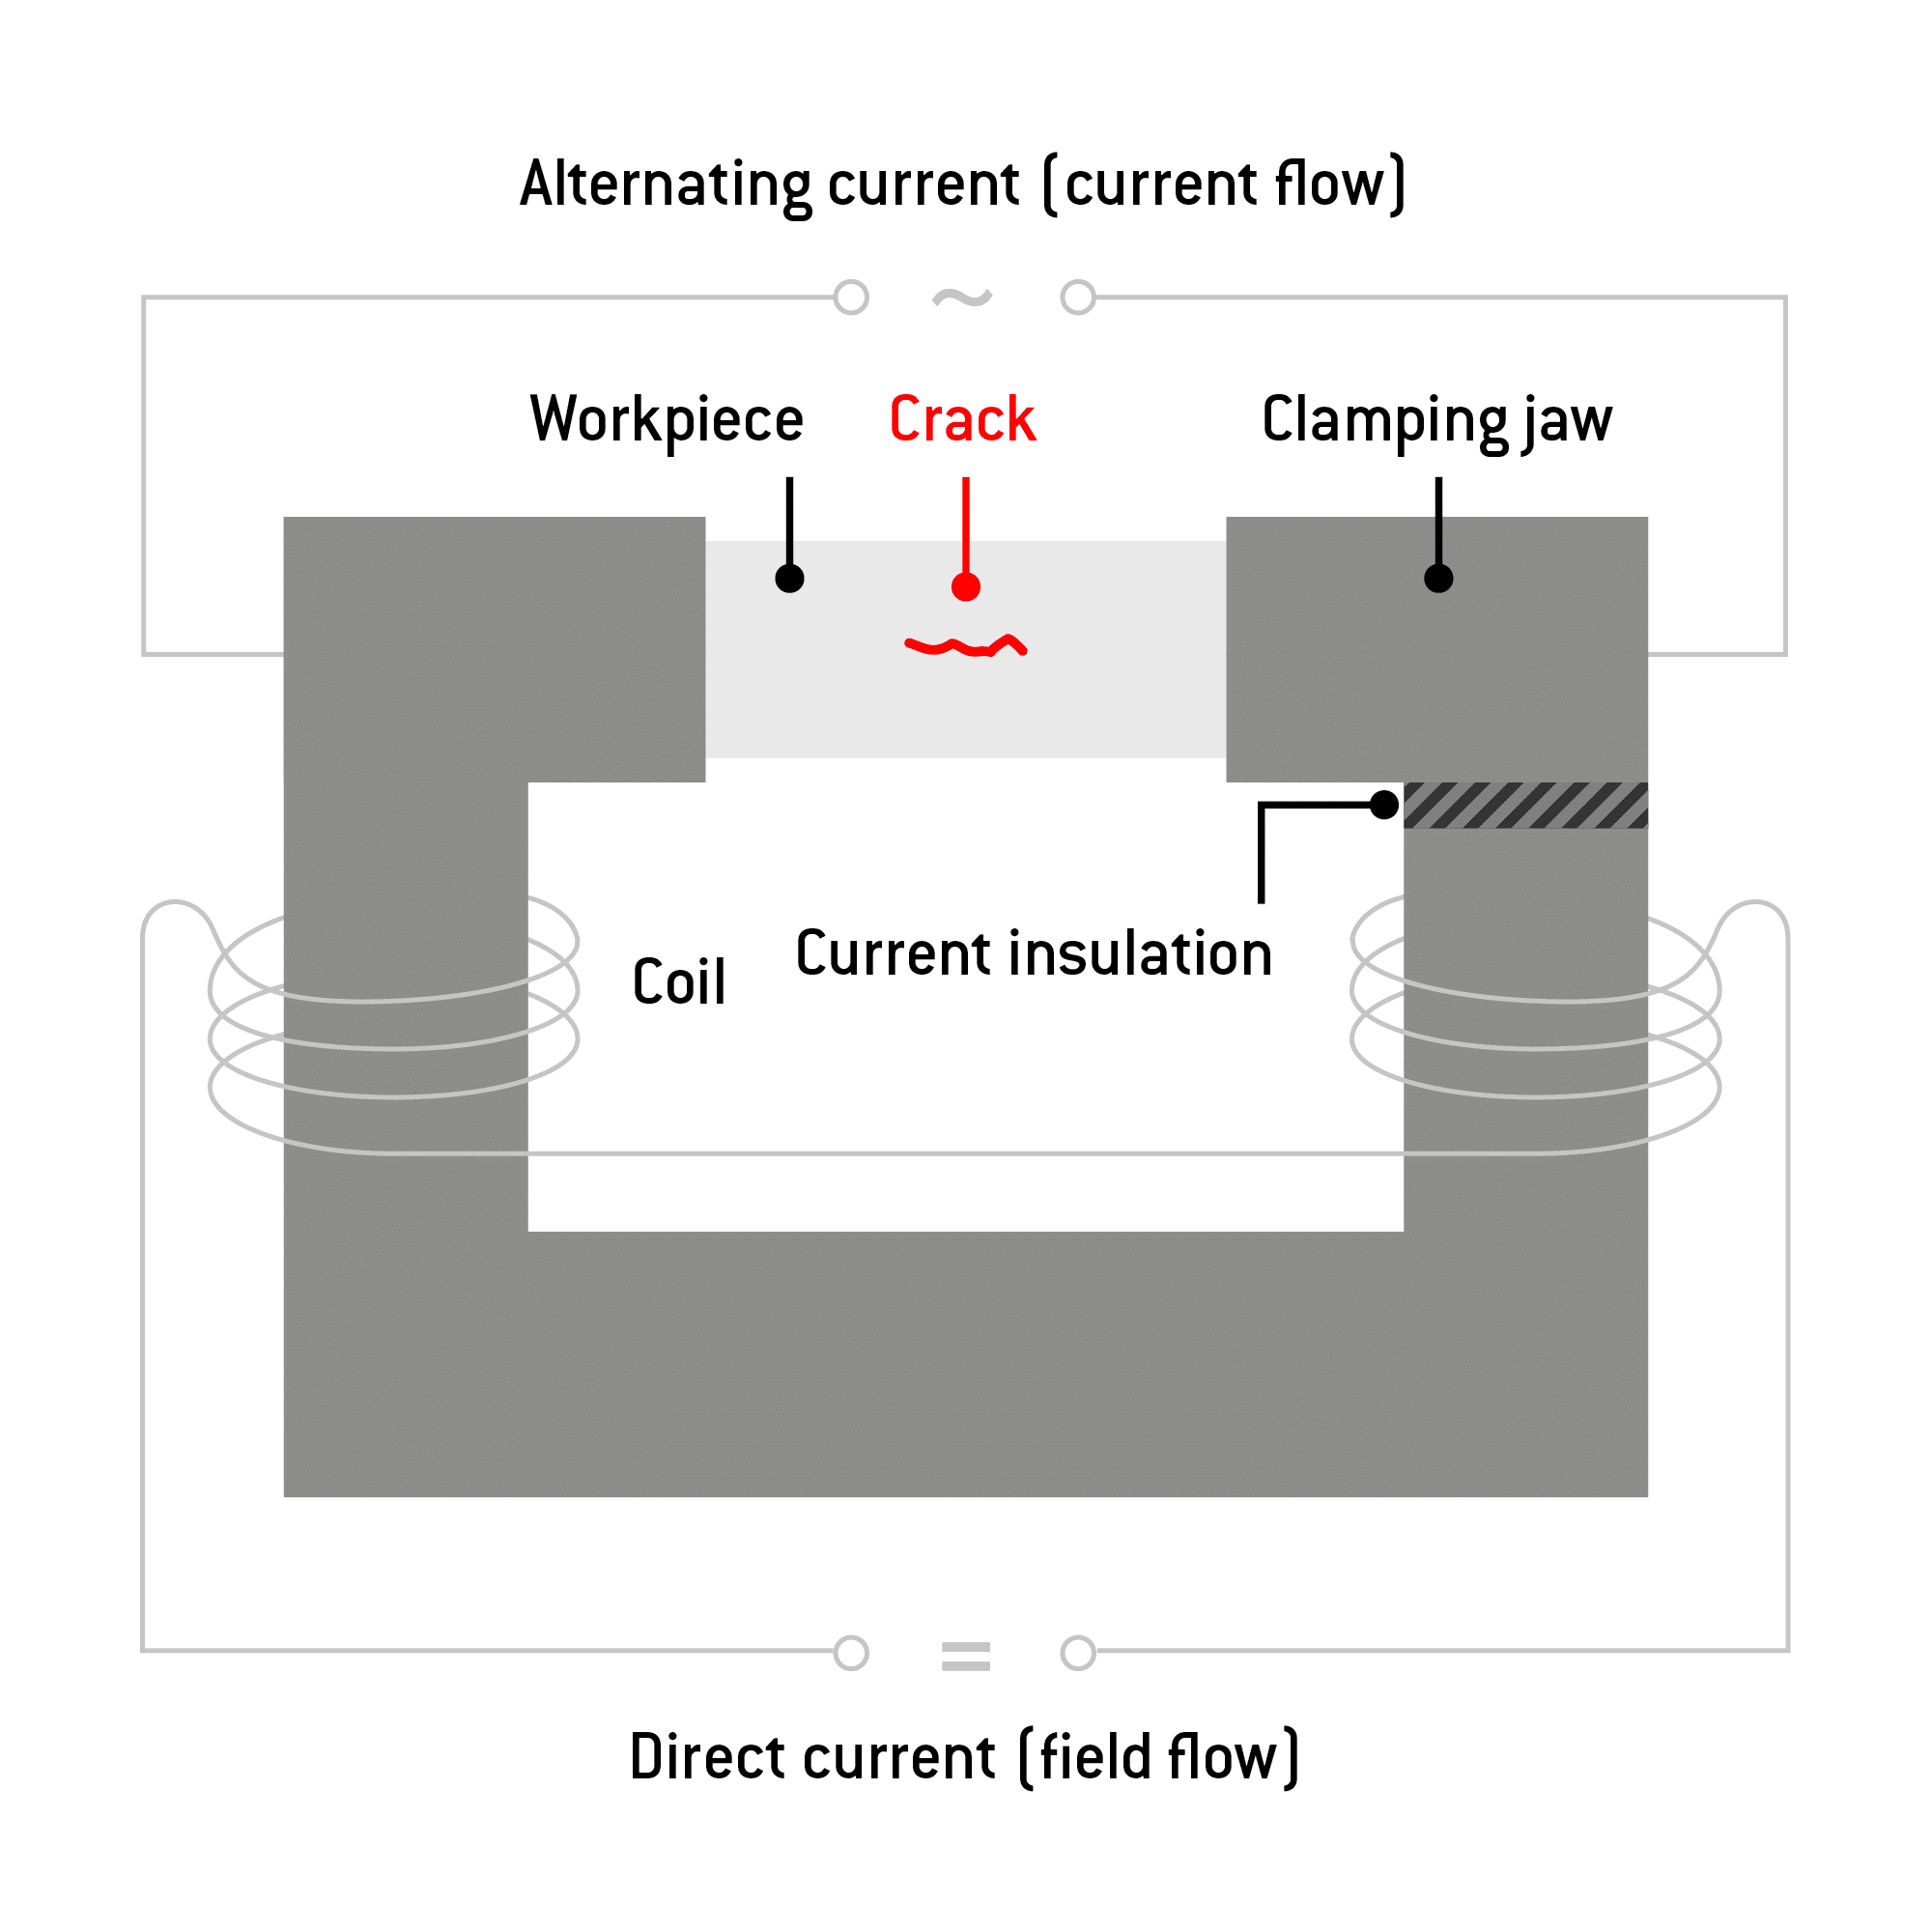
If the crack orientation cannot be predicted, the current and field flow methods can be carried out one after the other or in combination at the same time. For this purpose, the test specimen is clamped into an iron yoke with coils while, at the same time, a current is transmitted through the workpiece. This process is particularly useful for large quantities.
Applications and background information
Magnetic particle testing is basically suitable for all types of magnetisable materials. It is used, for example, for safety components in automotive engineering or for welds on pipelines.
The flux test is used for the automated inspection of such simple mass-produced components as rods or bolts. However, complex components with irregular geometry, such as crankshafts, springs, or brake discs, are equally suitable for a magnetic particle crack test. The same applies to some extent to rough surfaces.
Background
The production, processing, and use of steel causes the formation of cracks. Processes typically leading to cracking include casting, rolling, welding, and bending. If the crack formation remains untreated, the crack will progress from the surface to the inside of the component, and may cause a breakage. Magnetic powder crack testing can be used to check the component for cracks after each processing step.
Advantages of magnetic powder crack testing
Magnetic powder crack testing is used for the quality assurance of workpieces, and offers the following advantages:
- Fast and convenient process
- Reproducible
- Reliable according to DIN regulations
- Even hairline cracks and hidden cracks (just below the surface) become clearly visible
- No need for surface treatment
- Can also be applied to components with complicated shapes and large sizes
- Suitable for stationary and mobile use
DIN standards for crack testing
DIN EN ISO 9934-1 Non-destructive testing — Magnetic particle testing — Part 1: General principles
DIN EN ISO 17638 Non-destructive testing of welds - Magnetic particle testing
DIN EN ISO 1369 Founding – Magnetic particle testing
DIN EN ISO 10228-1 Non-destructive testing of steel forgings – Part 1: Magnetic particle testing
DIN EN ISO 10839-5 Non-destructive testing of steel pipes - Part 5: Magnetic particle testing of seamless and welded ferromagnetic steel pipes for the detection of surface defects
ASME Section V Article 7 & 25 Magnetic Particle Examination
ASME Section VIII
DIN 25435-2, In-service inspections for primary coolant circuit components of light water reactors – Part 2: Magnetic particle and penetrant testing
DIN EN 1330-7, Non-destructive testing - Terminology – Terminology – Part 7: Terms used in magnetic particle testing
DIN EN 1369, Founding – Magnetic particle testing
DIN EN 10228-1, Non-destructive testing of steel forgings – Part 1: Magnetic particle testing
DIN EN 10246-12, Non-destructive testing of steel pipes – Part 12: Magnetic particle inspection of seamless and welded ferromagnetic steel pipes for the detection of surface defects
DIN EN 10246-18, Non-destructive testing of steel pipes – Part 18: Magnetic particle inspection of the tube ends of seamless and welded ferromagnetic steel tubes for the detection of laminar imperfections
DIN EN ISO 3059, Non-destructive testing – Penetrant testing and magnetic particle testing – Viewing conditions
DIN EN ISO 9934-1, Non-destructive testing – Magnetic particle testing – Part 1: General principles
DIN EN ISO 9934-2, Non-destructive testing – Magnetic particle testing – Part 2: Detection media
DIN EN ISO 9934-3, Non-destructive testing – Magnetic particle testing – Part 3: Equipment
DIN EN ISO 17638, Non-destructive testing of welds – Magnetic particle testing
DIN EN ISO 23278, Non-destructive testing of welds – Magnetic particle testing – Acceptance levels
DIN CEN/TR 16638, Non-destructive testing – Penetrant and magnetic particle testing using blue light
Process locations
Refer to our interactive location overview to find the locations closest to you that offer procedures for testing and metalworking.
Customer information
Are you interested in a magnetic powder crack test? Our specialists will be happy to advise you on test procedures that are suitable for your components. Firstly, please tell us the material designation and dimensions, as well as the weight and quantity of the workpieces to be tested.